~ Suspension & Steering Setup ~
Here are some basic Westfield Suspension & Steering Settings
Click images to enlarge
The Westfield like many cars, performs best when setup correctly. Everybody prefers different styles of driving so Suspension will differ from car to car as a result but we all need a baseline to start from so below are some of the basic settings to which you can setup your car along with suggestion Steering and Tyre settings.
Firstly, what is Camber, Castor, Toe-in/Toe-out etc. Knowing what these are will help you to understand how your suspension settings affect the car and give you more of an insight of what happens when you change them.
Explanation
CAMBER:
This is the angle that the wheel/tyre sits in relation to the vertical as viewed from the front or back of the car. If the tops of the wheels are closer together than the bottoms, this is known as "Negative Camber", if the tops are further apart than the bottom of the tyres, this is known as "Positive Camber". It's an interesting fact that tyres develop there maximum grip at a small negative camber, which is around 1/2 degree negative so with this in mind, most cars are setup with Static Negative Camber.
As the car rolls around it's axis, the inner tyre on the corner produces more "Negative" camber, but the outside tyre developes "Positive" camber so a setting above 1/2 degree negative is usually required to counteract this.
CASTER:
Caster is the angle between the steering axis and the vertical axis as viewed from the side of the car. If the steering pivot axis is tilted backward (top towards the rear of the car), then this is "Positive caster", if it's tilted forward, then the caster is "Negative".
Positive caster will straighten the wheels when traveling forward and is used to enhance straight line stability, therefore, negative castor is never used.
The Castor angle is not adjustable on a Westfield unless you have rosejointed swinging arms so on most cars, this is set by the Westfield factory.
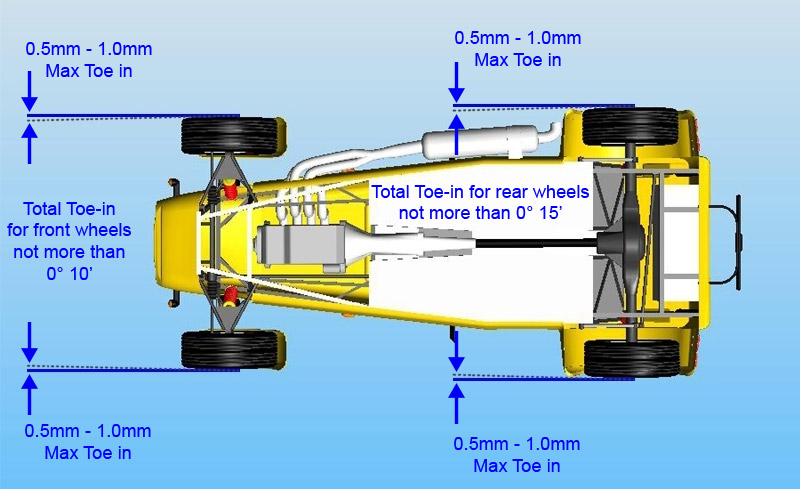
TOE-IN/OUT:
When the wheels are pointing towards each other, this is known as "Toe-in", if they are pointing outwards, this is called "Toe-out". The measurement is taken against the wheels pointing straight forward (Parallel) and is usually done in degress although some are measured in mm.
Toe settings can affect straight line stability and cornering factors as well as tyre wear, too much in or out is bad for tyre wear thus they should be checked by a qualified garage if you can.
A Little toe-in will increase straightline stability as both tyres are trying to turn into each other, whilst Toe-out will increase turn in speeds. With this in mind, you have to decide whether you like you car to turn in quickly and maybe oversteer a little or have a good straightline stability which is usually better for road cars.
DAMPING
This is control of motion or oscillation which is directly a result of road conditions. This can vary tremendously either intentionally or unintentionally. Just like the spring rates, the optimal damper setting will be less (softer) for comfort than it will be for better control (Harder) for Racing.
Damping controls the rate of speed and resistance of the vehicles suspension. An undamped car will oscillate up and down un-controlably, with proper damping, the car will settle back to a normal state in a minimal amount of time. Damping can be controlled by increasing or decreasing the resistance of fluid flow through the shock absorber via an adjustable control valve.
Adjusting
FRONT SUSPENSION:
On a Standard Westfield, there are only 4 adjustments you can make to the front suspension, these are Height, Camber & Toe & Damping, Castor is fixed and is not adjustable.
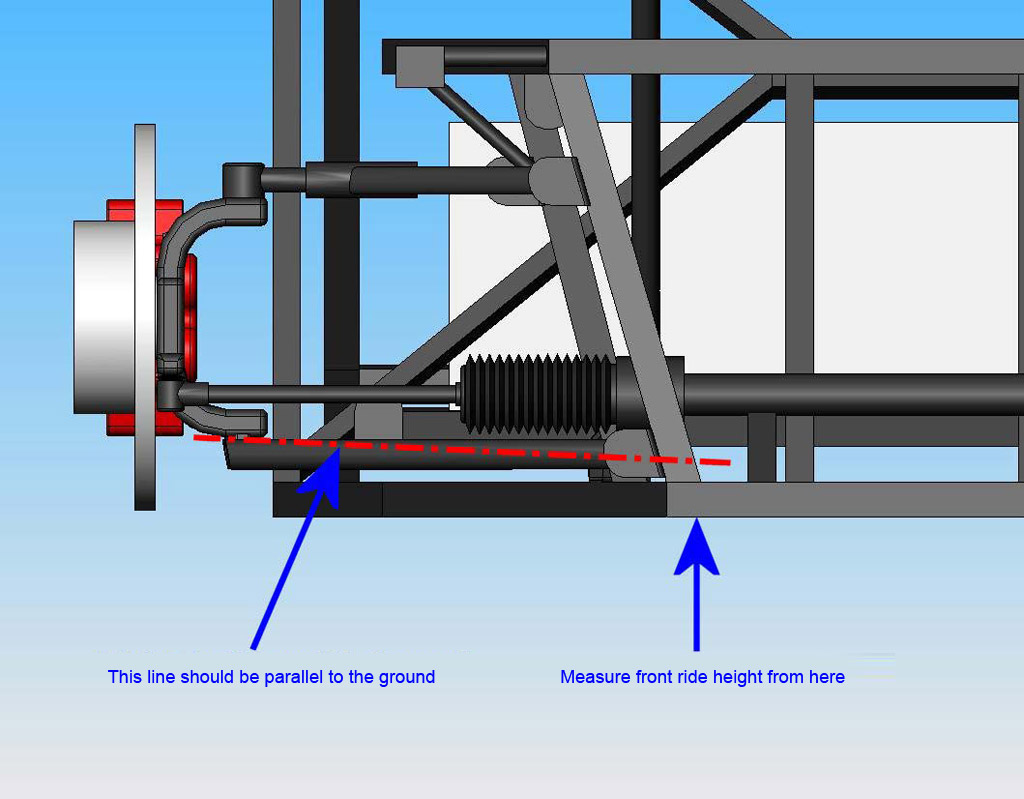
 HEIGHT is adjusted buy winding the spring platforms up or down the shock absorbers.
 They usually have two locking rings or one adjustable ring with a grub screw to secure it depending on what make/model you are using, a pair of "C" Spanners may be needed to adjust twin locking rings.
Up - Increases the ride height, Down - Decreases it.
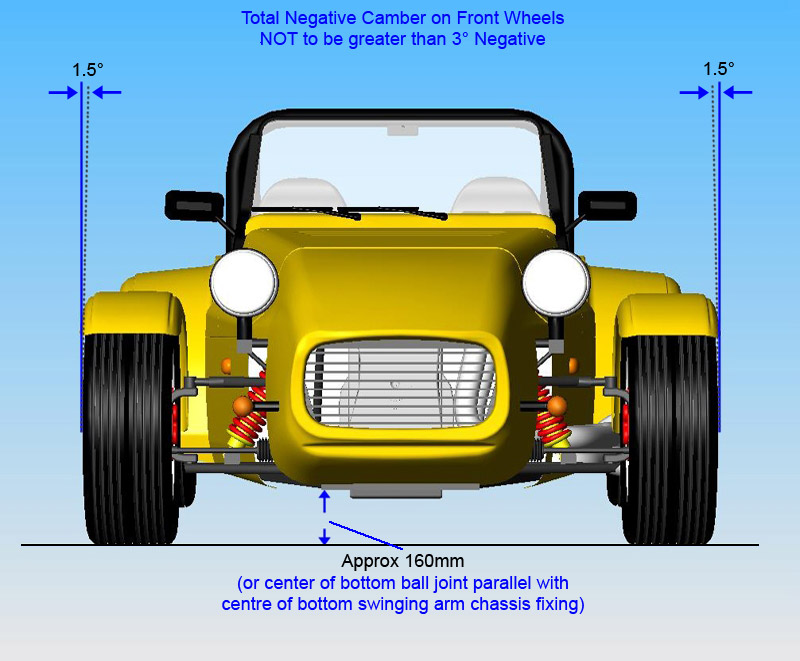
Ideally, you want your bottom wishbones to be horizontally inline with the centre of the bottom pickup point and the centre of the bottom ball joint (See Diagram left).
Don't forget to refit grub screws or lock rings together once finished.
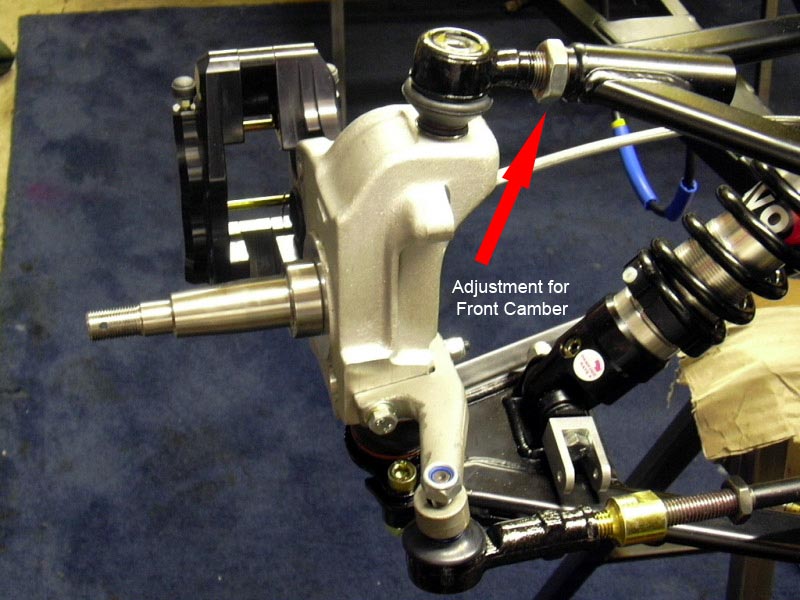 CAMBER is adjusted by winding the top ball joint outwards for more positive camber or inwards for more negative via the screw thread that goes into the top wishbone.
The later Westfield's have an adjustable mechanism to allow this to be done without having to take your suspension apart, if you don't have this facility, the only other way to adjust them is:
CAMBER is adjusted by winding the top ball joint outwards for more positive camber or inwards for more negative via the screw thread that goes into the top wishbone.
The later Westfield's have an adjustable mechanism to allow this to be done without having to take your suspension apart, if you don't have this facility, the only other way to adjust them is:a) Split the top ball joint, wind it in (negative) or out (positive) the required amount, refit ball joint and measure camber.
b) Undo the two top wishbone bolts that fasten it to the chassis, undo the locking nut on the top ball joint and twist the whole top wishbone around it's axis to the required amount.
Refit bolts and measure camber. One full turn of the ball joint is equal to 1/2 of a Degree of adjustment!
Don't forget to re-torque all bolts when finished.
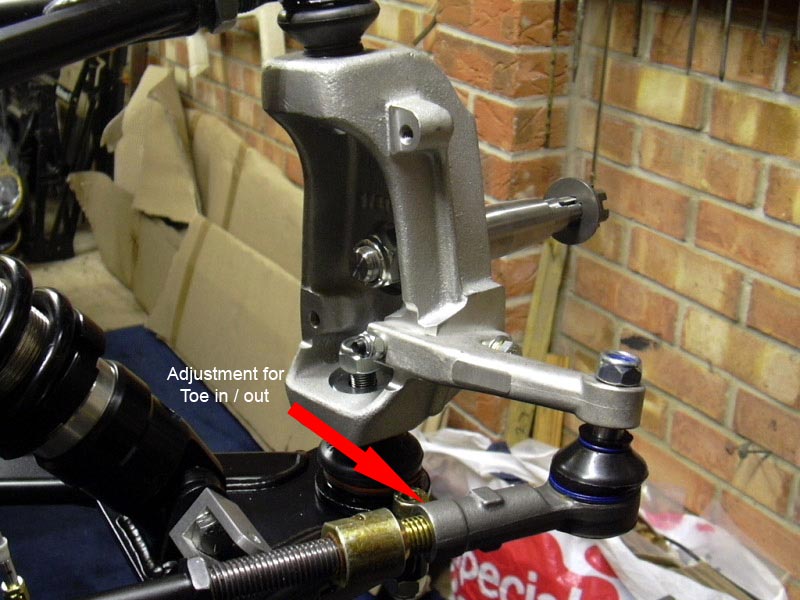 TOE IN/OUT is adjusted by splitting apart the track rod ends on your steering rack, undoing the locking nut and screwing them either in for "Toe in", or out for "Toe out" similar to the method used for the camber.
 Remember to use equal adjustments either end of the steering rack.
Don't forget to tighten the lock nuts afterwards.
 DAMPING is adusted via a knob/ screw or allen key at the base of the shock absorber. One of the ways to check it is to wind it fully out on both sides and count the number of click you need whilst turning it back in, this way, both sides are the same.
REAR SUSPENSION:
On the Rear Suspension of a Seiw Westfield, there are equally 4 ways to adjust it, these are Height, Camber, Toe in/out and Damping. Solid Axle cars are not adjustable except for height.
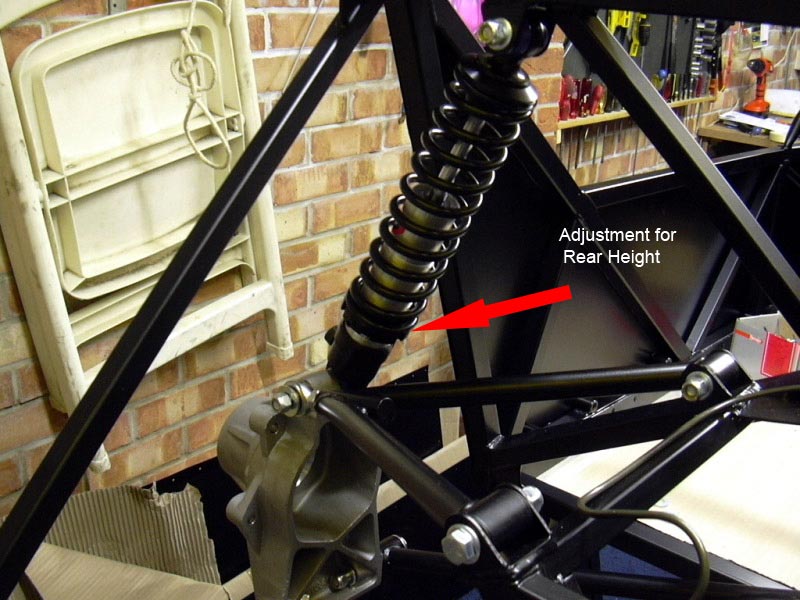 HEIGHT is adjusted exactly the same as the front suspension (above).
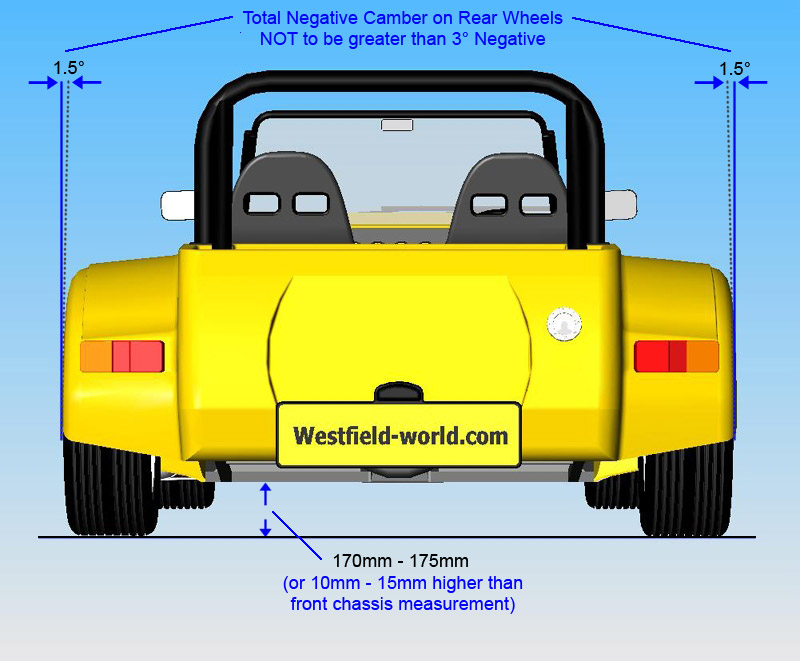
Ideally, you want the rear of the chassis to be around 10mm - 15mm higher than the front. This is measured from the bottom of the chassis rail just in front of the rear wheel arch.
 CAMBER (seiw only) is adjusted by undoing the nut & Bolt running through the bottom of the shock absorber & top of rear upright.
Then undo the locking nut on the Rose joint and screw in (for more negative camber) or out (for more positive camber).
One full turn of the rose joint is equal to 1/3 of a Degree of adjustment!
I would recommend replacing the nyloc nut when refitting and don't forget to lock the nut of the rosejoint too!
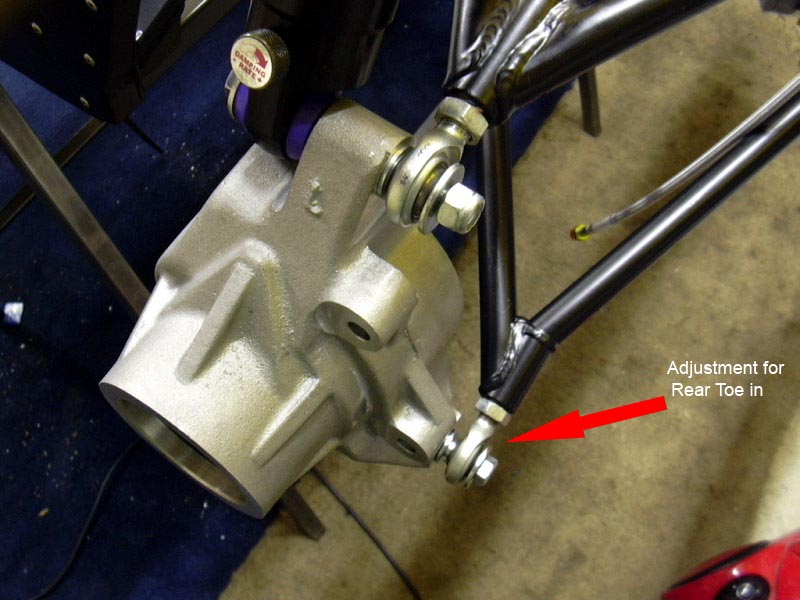 TOE IN/OUT is adjusted via the rear rosejoint on the bottom wishbone. The procedure is similar to the Camber above except you unscrew for more Toe in, and srew inwards for more Toe out!
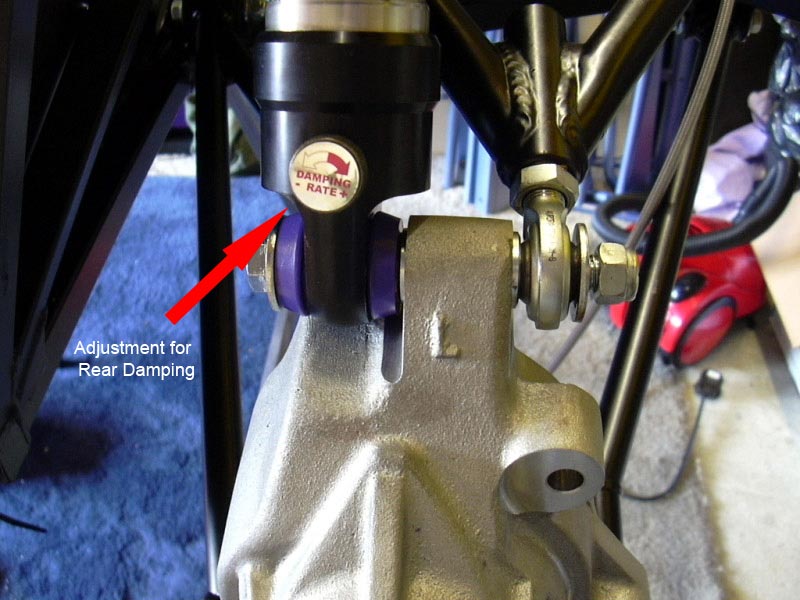 DAMPING on the rear suspension is adusted exactly the same as the front suspension above.
This particular shock absorber is a AVO (alloy) and has a knurled knob with which to turn.
Turning anti-clockwise softens the damping, clockwise makes it stiffer with around 15 settings .
Baseline Settings

The settings below are base settings which are fine as a starting point.
Depending on what you want to use your car for will determine how you go from here but these are fine for Road/General use and can be fine tuned to your own liking
i.e. if you want to do some touring then the rear suspension would probably need stiffening and raising slightly, Sprinting or Track work would probably need to be stiffer all round with the addition of Anti-rollbars etc but again this is down to personal preference and can only be determined by you.
| Part | Dimension | Notes |
|---|---|---|
| Front Ride Height | Approx 160mm | Determined by wheel/tyre combination |
| Front Camber | 1.5 - 2.0 Degrees Negative (Radials) | 0.5 - 1.0 Degrees Negative (Crossply Slicks) |
| Front Toe in/out | 0.5 - 1.0 mm Toe in | |
| Front Damping | 2 - 3 click from fully soft | |
| Rear Ride Height | Approx 170mm - 175mm | approx 10mm - 15mm higher than front |
| Rear Camber (seiw only) | 1.0 Degrees Negative | 0.5 - 1.0 Degrees Negative (Crossply Slicks) |
| Rear Toe in/out | 0.5 - 1.0 mm Toe in | |
| Rear Damping | 2 - 3 clicks from fully soft |